* disambiguate Bootmagic rules in keymaps

The files edited by this commit were added at a point in time where `BOOTMAGIC_ENABLE = yes` enabled full Bootmagic.

This commit edits the files to specify that full Bootmagic is intended.

* remove BOOTMAGIC_ENABLE=full setting

* unify commented BOOTMAGIC_ENABLE rules in keyboards

Explicitly sets `BOOTMAGIC_ENABLE = no` in keyboards where the rule was commented out.

Command:

```
find keyboards/ -type f -name 'rules.mk' -and -not -path '*/keymaps/*' -exec sed -i -e 's;#[ \t]*\(BOOTMAGIC_ENABLE\)[ \t=]\+\([a-zA-Z]\+\).*;\1 = no       # Virtual DIP switch configuration;g' {} +
```

* remove commented Bootmagic rules from keymap/user level

Command:

```
find keyboards/ layouts/ users/ -type f -name 'rules.mk' -exec sed -i -e '/#.*\(BOOTMAGIC_ENABLE\)[ \t=]\+\([a-z]\+\).*/d' {} +
```

* update keyboard BOOTMAGIC_ENABLE rule formatting

Sets the formatting of BOOTMAGIC_ENABLE rules to `BOOTMAGIC_ENABLE = [value]`, without the inline comments (which will be replaced later).

Command:

```
find keyboards/ -type f -name 'rules.mk' -and -not -path '*/keymaps/*' -exec sed -i -e 's;\(BOOTMAGIC_ENABLE\)[ \t=]\+\([a-z]\+\).*;\1 = \2;g' '{}' +
```

* update keyboards' BOOTMAGIC_ENABLE settings

Updates keyboard `rules.mk` files to use `BOOTMAGIC_ENABLE = lite` where `BOOTMAGIC_ENABLE = full` was being used.

Command:

```
find keyboards/ -type f -name 'rules.mk' -and -not -path '*/keymaps/*' -exec sed -i -e 's;\(BOOTMAGIC_ENABLE = \)full;\1lite;g' '{}' +
```

* update keymap/user BOOTMAGIC_ENABLE settings

Updates keymap/user `rules.mk` files to use `BOOTMAGIC_ENABLE = lite` where `BOOTMAGIC_ENABLE = full` was being used.

Commands:

```
find keyboards/ -type f -name 'rules.mk' -and -path '*/keymaps/*' -exec sed -i -e 's;\(BOOTMAGIC_ENABLE[ \t=]\+\)full;\1lite;g' '{}' +
find layouts/community/ users/ -type f -name 'rules.mk' -exec sed -i -e 's;\(BOOTMAGIC_ENABLE[ \t=]\+\)full;\1lite;g' '{}' +
```

* remove and replace inline comments in keyboards and keymap/user files

Removes and replaces the inline comments, which have been updated to read `Enable Bootmagic Lite`.

Commands:

```
find keyboards/ -type f -name 'rules.mk' -and -path '*/keymaps/*' -exec sed -i -e 's;\(BOOTMAGIC_ENABLE\)[ \t=]\+\([a-z]\+\).*;\1 = \2;g' '{}' +
find layouts/community/ users/ -type f -name 'rules.mk' -exec sed -i -e 's;\(BOOTMAGIC_ENABLE\)[ \t=]\+\([a-z]\+\).*;\1 = \2;g' '{}' +
find keyboards/ layouts/community/ users/ -type f -name 'rules.mk' -exec sed -i -e 's;\(BOOTMAGIC_ENABLE = lite\);\1     # Enable Bootmagic Lite;g' '{}' +
find keyboards/ layouts/community/ users/ -type f -name 'rules.mk' -exec sed -i -e 's;\(BOOTMAGIC_ENABLE = yes\);\1      # Enable Bootmagic Lite;g' '{}' +
find keyboards/ layouts/community/ users/ -type f -name 'rules.mk' -exec sed -i -e 's;\(BOOTMAGIC_ENABLE = no\);\1       # Enable Bootmagic Lite;g' '{}' +
```

* rename improperly named makefiles

Some files intended to be used as makefiles had improper names causing them to not be used as intended when building.

This commit corrects the filenames of the affected files.

* update renamed file with new rule formatting

* update QMK's template files

Updates QMK's `rules.mk` templates to use the new inline comment.

* update QMK Docs

- remove documentation of full Bootmagic
- update links to Bootmagic Lite doc
- add doc for Magic Keycodes

* rules.mk patch for coarse/ixora and coarse/vinta
|
||
|---|---|---|
| .. | ||
| base_colemak.c | ||
| base_colemak.md | ||
| base_dvorak.c | ||
| base_dvorak.md | ||
| base_dvorak_descramble.c | ||
| base_dvorak_descramble.md | ||
| base_numpad.c | ||
| base_numpad.h | ||
| base_numpad.md | ||
| base_qwerty.c | ||
| base_qwerty.md | ||
| base_qwerty_basearrow.c | ||
| base_qwerty_basearrow.h | ||
| base_qwerty_basearrow.md | ||
| base_workman.c | ||
| base_workman.md | ||
| config.h | ||
| keymap.c | ||
| minifan_config_compact.h | ||
| readme.md | ||
| rules.mk | ||
| todo.md | ||
| unicode_macros.c | ||
| unicode_macros.h | ||
| unicode_weurope.h | ||
| user_config.h | ||
readme.md
Minivan keyboard layout Minifan
A 40% keyboard made first by TheVan Keyboards https://thevankeyboards.com now taken over by TKC https://thekey.company

Table of Contents
  1  Overview
      1.1 Hardware compatibility
      1.2 Software compatibility
  2  'make' example
  3  Base layouts
      3.1  Normal layouts
            3.1.1 Qwerty
            3.1.2 Qwerty with arrows on Base
            3.1.3 Dvorak
            3.1.4 Dvorak²
            3.1.5 Colemak
            3.1.6 Workman
      3.2 Special layouts
            3.2.1 Numbers pad
  4 The common system
      4.1 Layer access
      4.2 Layout in graphics
      4.3 Layout in text
      4.4 Movement layer options
      4.5 Numbers pad layer options
  5 Led colors for layers
  6 Compile options
  7 Language support
      7.1 Input methods
      7.2 Unicode symbols
  8 Speed measuring
      8.1 Speed Led color compilation assist
  9 Text size measuring
      9.1 Text size Usage
 10 Making your own base layer(s)
 11 Evisceration
 12 Key associations
      12.1 Compared to regular keyboard
 13 Trouble shooting
    • Compiling
    • Unicode
    • Leds
    • Weird layer jumping
    • Difficult/impossible key combinations ?
 14 Why you want this layout
 15 BUGS
 16 Resources
 17 Author(s)
1 Overview
☑ Intuitive: Key placement follows what a 10 finger typist is used to on a regular keyboard. Similar keys meanings are on the same key in different layers, or the same finger, etc. See also chapter 12, Key associations. Thumbs control the most used layer access.
☑ Feature rich: Dual layout, with several standard layouts to choose from. Expanded character set. Measure typing speed and/or amount of text typed. Mouse control, media control, power control, Unicode encoding for several platforms. In total there are about 4 times as many key functions than on a regular keyboard.
☑ Configurable: Choose between standard layouts (Qwerty, Dvorak, etc);
additional hardware keys ‛command/south-paw’ and/or ‛arrow’; movement
layer WASD or flat arrows/mouse; numbers pad similar to regular numbers
and/or like a regular numbers pad; and other settings. Easy to add your
own layers. See
☒ What it does not do: work on a computer set to a non-English language,
such as German or French. (To add such functionality requires some work,
but it seems it should be possible. See 

By key view:

1.1 Hardware compatibility
This keymap functions on Minivan hardware variants with 44, 45 and 46 keys.
It may be fairly easily ported to 12x12x12x[11|12|13] keyboards.
1.2 Software compatibility
This keymap relies on Unicode, in an attempt to avoid the “dead key” system for accented characters on many non-English keyboards. You need to have Unicode input working on your computer.
On a Linux computer operating system, this keymap is designed to work with this keyboard/language setting:
    > setxkbmap -layout us
    > echo $LANG
    `en_US.UTF-8`
If that works for you, you can type the most important characters in the western European group of languages, native from the keyboard.
This keymap might not function as expected if you want to use a different keyboard language setting in your operating system.
See also chapter 6 Language support.
2 'make' example
 … Download the repository, resolve software dependencies etc..
 … To change compile options: edit ./user_config.h (or `./minifan_config_compact.h`)
 > cd […]/qmk_firmware
 > make thevankeyboards/minivan:josjoha
 > su
 # dfu-programmer atmega32u4 erase
 # dfu-programmer atmega32u4 flash thevankeyboards_minivan_josjoha.hex
 # dfu-programmer atmega32u4 start
This “Minifan” layout is explained in several readme files, with
links to the others files in this readme. The common system is explained
in this readme.md file. The options for the letters and number/symbol
layer pairs (two pairs in the dual layout) are explained in their
separate readme file, see immediately below. Compile options are detailed
in
3 Base layouts
Layouts are presented here in a sort of simplified key caps view. If a
base layer pair has its own user configuration options, they are located
in ./base_NAME.h.
3.1 Normal layouts
These are layouts for commonly used configurations, such as Qwerty or Dvorak.
3.1.1 Qwerty

For the readme about the Qwerty version, see ➡ 
3.1.2 Qwerty with arrows on Base

For the readme about this Qwerty variation, see ➡ 
3.1.3 Dvorak

For the readme about the Dvorak version, see ➡ 
3.1.4 Dvorak²
Regular Dvorak for a computer already set to Dvorak.
For the readme about the Dvorak² version, see ➡ 
3.1.5 Colemak

For the readme about the Colemak version, see ➡ 
3.1.6 Workman

For the readme about the Workman version, see ➡ 
3.2 Special layouts
These are unusual layouts. Most people will probably only want one of these on the ‛Alternate’ layout, with a normal layout on ‛Default’. How this works is explained below.
3.2.1 Numbers pad

For the readme about the Numpad version, see ➡ 
4 The common system

4.1 Layer access
The graphic below shows how layers are reached from the ‛Default base’ layer.
This seems to be the place where one is supposed to say: “This is simple”. It may look more confusing than it is. If you write down an alphabet A,B, ➡ Z, made arrows from every key on a keyboard picture to one of the letters, it could look just as confusing. When switching to a layer, you only think about where you want to go.
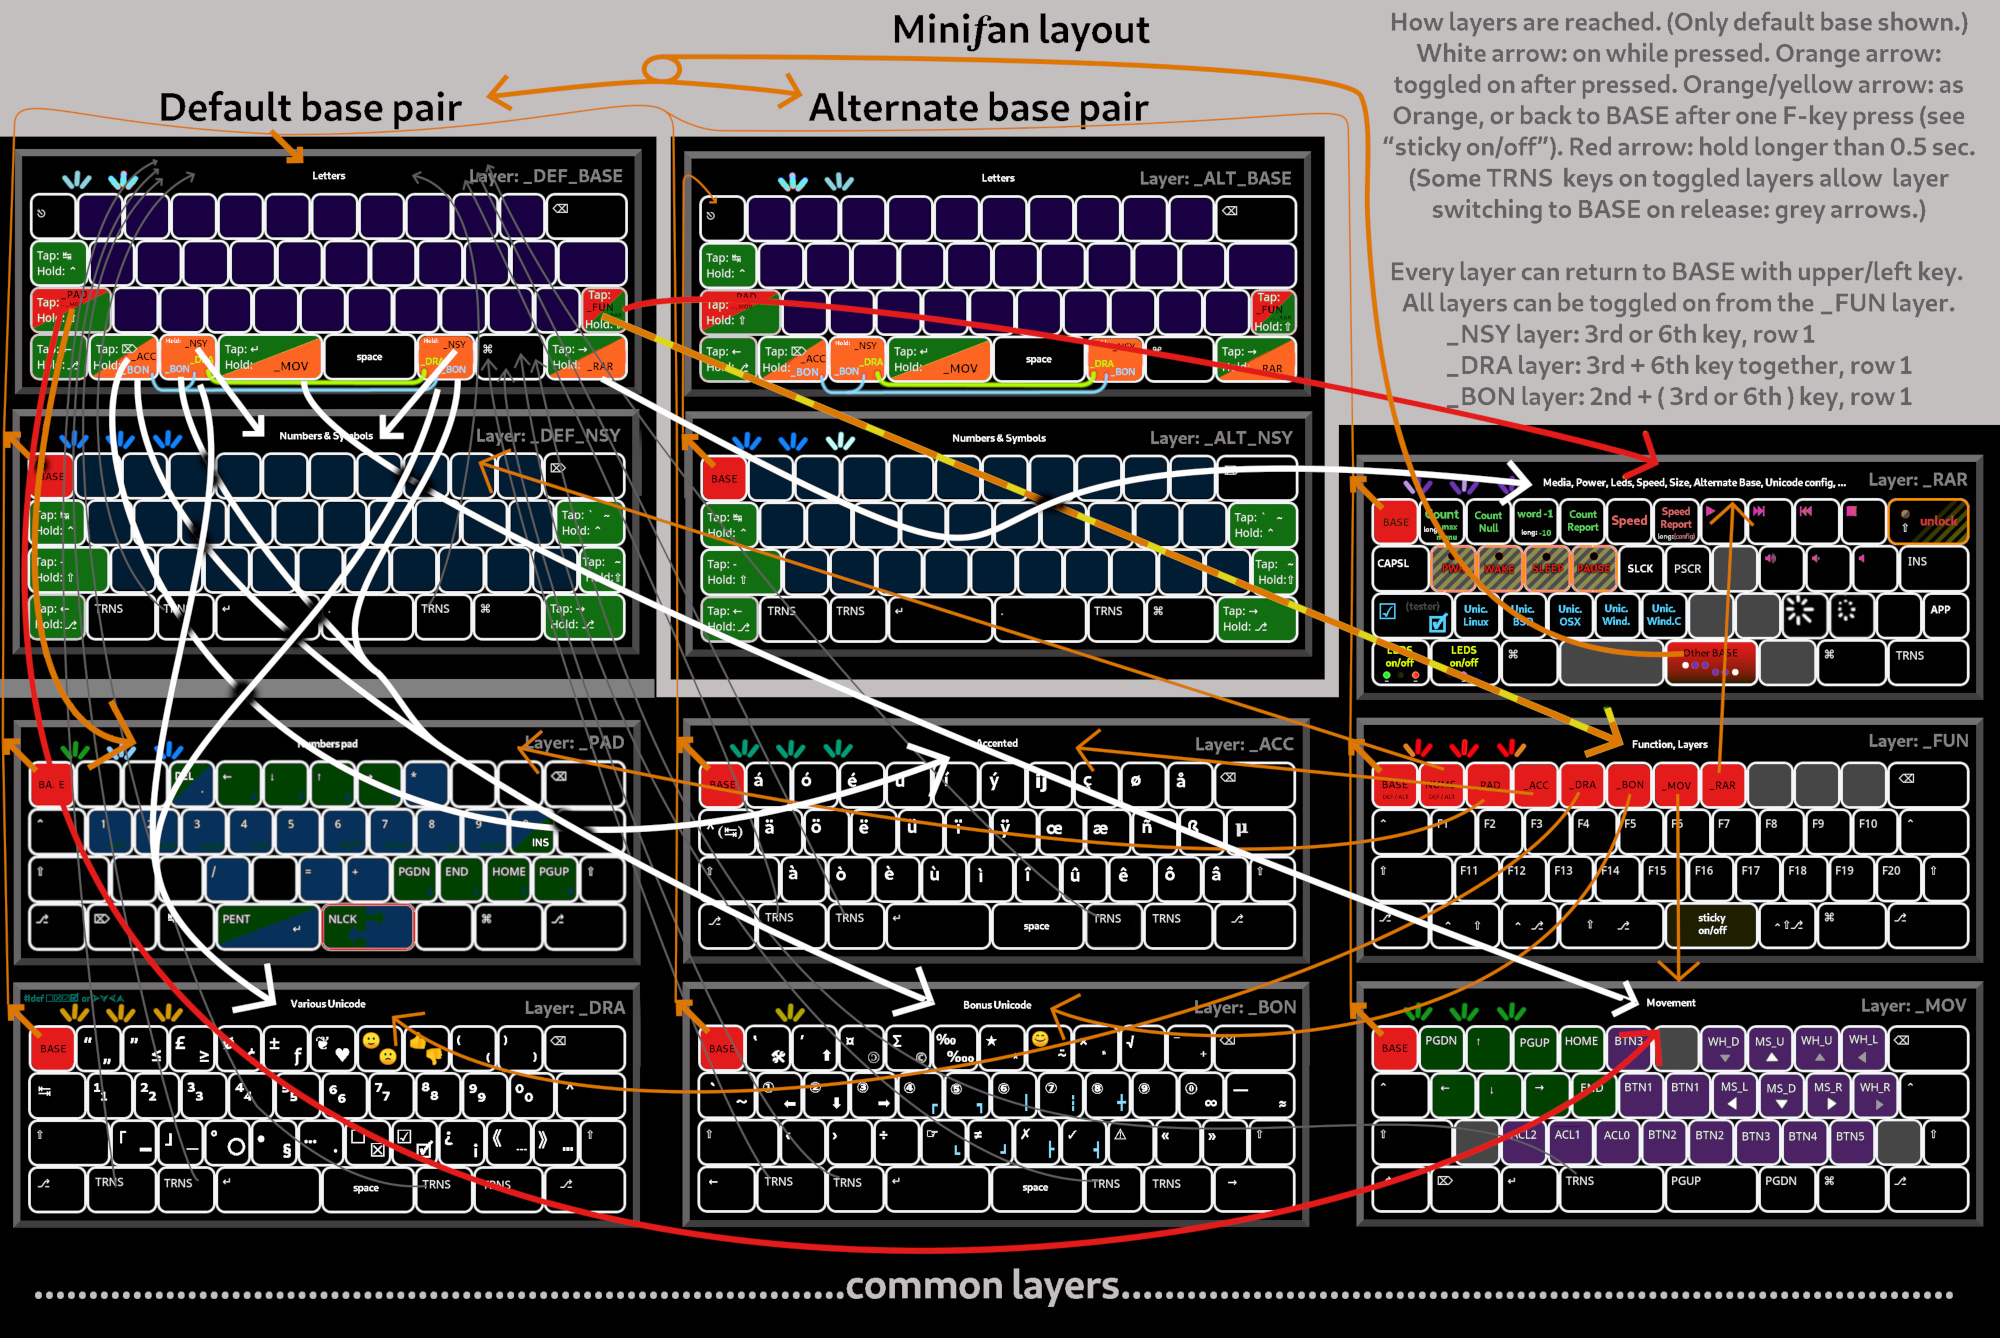
Each of the two base layers comes with its own second layer, typically
numbers-symbols. The other layers are used common between the default and
alternate base layers. You can switch between the default base layer
(typically letters), and another base layer, the alternate base layer
(also typically letters), on the _RAR layer with key ‛Other Base’.
               Layer overview:                    Defined in:

    • Default Letters / Base                   ┓
    • Default Numbers-symbols                  ┃
                                               ┣ ./base_….c/md files
          • Alternate Letters / Base           ┃
          • Alternate numbers-symbols layout   ┛

       • Numbers pad                           ┓
       • Accented characters                   ┃
       • Additional Unicode characters         ┃
       • More Additional Unicode characters    ┣ ./keymap.c(etc)/readme.md
       • Movement arrows/mouse                 ┃   “The common system”
       • Function keys / layer toggles         ┃
       • Power, media, Speed, Text size, etc.  ┛
4.2 Layout in graphics
 Layer:
 DEF_BASE
 Layer:
 DEF_NSY
 Layer:
 ALT_BASE
 Layer:
 ALT_NSY
 Layer:
 _PAD
^ See below for a different configuration of the numbers pad keys. See above for a Base layout for a numbers pad.
 Layer:
 _ACC
 Layer:
 _DRA
 Layer:
 _BON
 Layer:
 _FUN
 Layer:
 _MOV
^ There is an alternative flat arrow configuration for this layer (see below), and options to compile with the 'arrow' hardware layout.
 Layer:
 _RAR
4.3 Layout in text
 What comes on “___” is to be defined by the Base layers choice.

     Layer _DEF_BASE (Letters layer, see ./base* files for what comes on ‛__’)
                                              | Right hand
     <pink2     <pinky<ring <middl<index<indx2| indx2>index>middl>ring> pinky>pinky2>   // Keys by finger
     -o-                                     <|>                                    ... //-o- Base access
     Esc        __    __    __    __    __    | __    __    __    __    __         Bksp
     Tab+LCtl   __    __    __    __    __    | __    __    __    __    __           __
     LSht+_PAD  __    __    __    __    __    | __    __    __    __    __    RSht+_FUN
         +_MOV⁵                               |                                   +_RAR⁶
 ---------------------------------------------------------------------------------------
 Left+LAlt Del;_ACC _..._NSY(_DRA)  Enter+_MOV| Space  _..._NSY(_DRA) RGUI    Right;_RAR
           hold     hold₍₁,₂٭₎      hold      |        hold₍₁,₂٭₎             hold     // switch type
           hold₍₂₎  ^-┃-----------------------+--------^ ┃                          // ₁₎ both = _DRA
           ┗━━━_BON━━━╋┅───────────┄┄┄«or»┄┄┄─+─────────┅┛                          // ₂₎ both = _BON
 <1   ±    <2       <3              <4        | 4>     3>             2>   ±  1>    // Keys by number
      ^³                                                                   ^⁴   // Optional more keys
    (LGUI)                                                               (_MOV)

 ₁) Dual hold for _DRA, single hold for _..._NSY. Marked by: ^--…--^
 ₂) Hold key “<2” with either٭ key “<3” or “3>” for _BON, single hold “<2” for _ACC. Marked: ┗━━…━━┛
 ³) 'South paw' hardware configuration. Configurable, default shown.
 ⁴) 'Arrow' hardware configuration  Configurable, default shown.
 ³ ⁴) There are two more optional hardware keys, to make it easier to compile for
      a 12x12x12x11 or 12x12x12x12 layouts.
 ⁵) Left Shift when pressed with another key. Medium long: to toggle _PAD. Long: toggle _MOV.
 ⁶) Right shift when pressed with another key. medium long: to toggle _FUN. Long: toggle _RAR.
Remarks: The left modifiers have a slight delay in combination with an outside pointer device (mouse, stylus).
It seems this will be difficult to fix, because it is spread over two devices. To avoid the
±0.2 second delay, activate a layer where the modifiers are direct (_PAD, _MOV), using the layer toggle on
left shift.
The two keys with ';' (Del;_ACC, Right;_RAR) do not auto-repeat on double tap, like QMK normal layer-tap keys.
There is an uncluttered Delete on _PAD, an uncluttered Right arrow on the _MOV layer.
There is an uncluttered Tab on both the _DRA and _ACC layers. They can be modified with Control there.
Holding both _..._NSY keys left and right of the "split space bar" (enter, space) results in layer _DRA.
Holding either one of the just above mentioned _..._NSY layer keys (<3 and 3>), with the _ACC layer key
(on <2) results in layer _BON.
 Layer _..._NSY (Numbers and SYmbols, ./base* files for what comes on ‛__’)

 <pink2   <pinky<ring <middl<index<indx2| indx2>index>middl>ring>pin>pink2>
          -*-                          <|>                                  //(toggle) Access on _FUN
 BASE     __    __    __    __    __    | __    __    __    __   __     Bspc
 Tab+LCtl __    __    __    __    __    | __    __    __    __   __  __+RCtl
 -+LSht   __    __    __    __    __    | __    __    __    __   __  __+RSht
 ---------------------------------------------------------------------------
             Left+LAlt ___   ___   Ent  | .   ___   RGUI  Right+RAlt
                             -*-       <|>    -*-                        //(hold) Access on _DEF_BASE
               <1   ±  <2    <3    <4   | 4>  3>    2>  ± 1>
                    ^                                   ^
                  (LGUI)                              (_MOV)
 Layer _FUN (F-keys, Layer access)

 <pink2<pinky<ring <middl<index<indx2| indx2>index>middl>ring> pinky>pink2>
 toggl toggl set   toggl toggl toggl | toggl toggl                            // Type of layer switch
                                    <|>
 BASE: NUMS: _PAD  _ACC  _DRA  _BON  | _MOV  _RAR  xxx   xxx   xxx   Bspc       //':' are dynamic ...
 LCtl  F1    F2    F3    F4    F5    | F6    F7    F8    F9    F10   RCtl
 LSht  F11   F12   F13   F14   F15   | F16   F17   F18   F19   F20   RSht
 ---------------------------------------------------------------------*--       //-*-  toggle on Base
          LAlt  LCtl&  LCtl&  LSht&  | FUN< +LCtl&LSht RGUI   RAlt              //... < toggle 'stay'
                LSht   LAlt   LAlt   |      &LAlt
                +xxx   +xxx   +xxx   |      +xxx
                                    <|>
          <1  ± <2     <3     <4     | 4>   3>         2>  ±  1>
              ^                                            ^
            (LGUI)                                       (_MOV)
Remarks. FUN< toggles an immediate return to the Base layer after pressing an F-key,
or staying on the _FUN layer. Right led yellow indicates F-layer stays active.
This is the triangle configuration for arrows, arrow are on left hand (WASD):
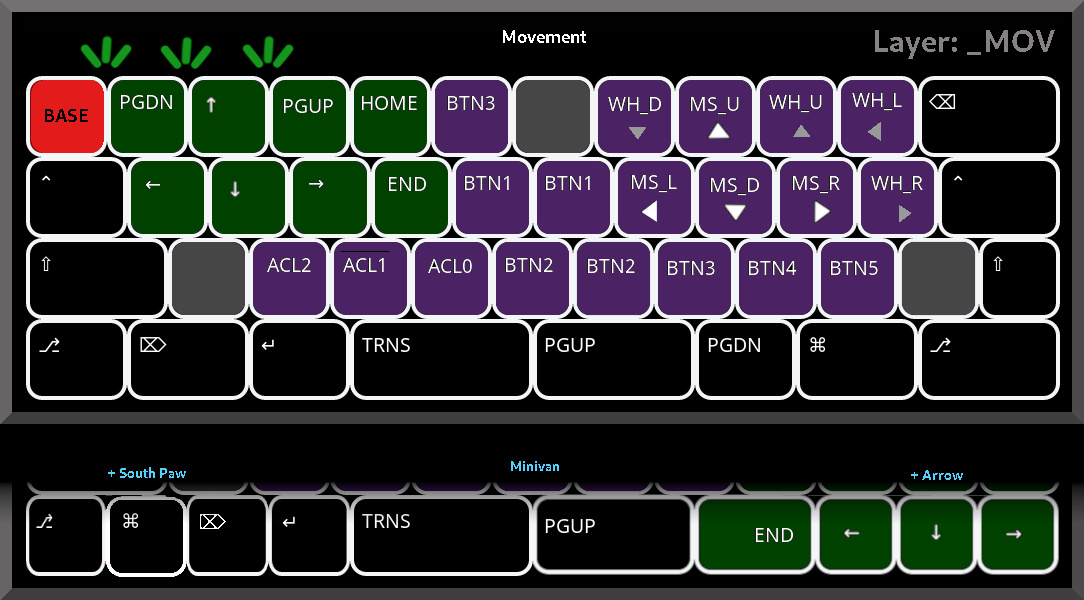
 Layer _MOV (MOVement, mouse movement on right hand)

 <pinky2<pinky<ring <middl<index<indx2| indx2>index>middl>ring> pinky>pink2>
                                     <|>-*-
 Base   PgDn  Up    PgUp  Home  Btn3  | xxx   WhDn  MsUp  WhU   WhLft Bksp
 LCtl   Left  Down  Right End   Btn1  | Btn1  MsLft MsDn  MsRht WhRht RCtl
 LSht   xxx   Acc2  Acc1  Acc0  Btn2  | Btn2  Btn3  Btn4  Btn5  xxx   RSht
 -------------------------------------------------------------------------
                 LAlt Del   Ent   ___ | PgUp  PgDn  RGUI  RAlt
                                  -*-<|>
                 <1 ± <2    <3    <4  | 4>    3>    2>  ± 1>
                    ^                                   ^
                  (LGUI)                              (DOWN)
Remarks. For the Minivan arrow hardware layout with arrow cluster, you get this on ‛Base’:
 (…)
 LSht+_PAD ;:    qQ    jJ    kK    xX    | bB    mM    wW    vV    zZ    RSht+_FUN
 -------------------------------------------------------------------------------
 Left+LAlt Del;_ACC _..._NSY(_DRA) Enter+_MOV| Space  _..._NSY(_DRA) RGUI  _MOV  Right;_RAR
                                                                           ^^^^     // new key (toggle)
… and this on _MOV for the triangle configuration:
 (…)
 LSht*- xxx   Acc2  Acc1  Acc0  Btn2  | Btn2  Btn3  Btn4  Btn5  _Up_  RSht
 ---------------------------------------------------------------------------
                 LAlt Del   Ent   ___ | PgUp       PgDn  _Left__Down__Right_
                                  -*-<|>
                 <1 ± <2    <3    <4  | 4>         3>     2>   _±_    1>
                    ^
                  (LGUI)
… or this on _MOV for the triangle arrow configuration with additional navigation keys:
 BASE   PgDn  Up    PgUp  Home _Btn4_ | xxx   WhDn  MsUp  WhU   WhLft Bksp
 LCtl   Left  Down  Right End   Btn1  | Btn1  MsLft MsDn  MsRht WhRht RCtl
 LSht*- xxx   Acc2  Acc1  Acc0 _Btn5_ | Btn2  Btn3 _Home__PgUp_ _Up_ _PgDn_
 ---------------------------------------------------------------------------
                 LAlt Del   Ent   ___ | PgUp      _End_  _Left__Down__Right_
                                  -*-<|>
                 <1 ± <2    <3    <4  | 4>         3>     2>   _±_    1>
                    ^
                  (LGUI)
This is the flat configuration for arrows, arrow are on right hand:
 <pinky2<pinky<ring <middl<index<indx2| indx2>index>middl>ring> pinky>pink2>
                                     <|>-*-
 BASE   WLft  WDn   WUp   WRht  xxx   | Btn3  PgUp  Home  End   PgDn  Bksp
 LCtl   MLft  MDn   MUp   MRht  Btn1  | Btn1  Left  Up    Down  Right RCtl
 LSht*- Btn5  Btn4  Btn3  Butn2 xxx   | Btn2  Acc0  Acc1  Acc2  xxx   RSht
 -------------------------------------------------------------------------
                 LAlt Del   Ent   ___ | PgUp  PgDn  RGUI  RAlt
                                  -*-<|>
                 <1 ± <2    <3    <4  | 4>    3>    2>  ± 1>
                    ^                                   ^
                  (LGUI)                              (DOWN)
For the Minivan arrow hardware layout with flat arrow cluster, you get this on _MOV:
 (…)
 BASE   WLft  WDn   WUp   WRht  xxx   | Btn3  PgUp  Home  End   PgDn  Bksp
 LCtl   MLft  MDn   MUp   MRht  Btn1  | Btn1  Left  Up    Down  Right RCtl
 LSht*- Btn5  Btn4  Btn3  Butn2 xxx   | Btn2  Acc0  Acc1  Acc2  xxx   RSht
 ---------------------------------------------------------------------------
                 LAlt Del   Ent   ___ | PgUp      _Left_ _UP_  _Down__Right_
                                  -*-<|>
                 <1 ± <2    <3    <4  | 4>         3>     2>   _±_    1>
                    ^
                  (LGUI)
… or this on _MOV for the flat arrow configuration with additional navigation keys:
 BASE   WLft  WDn   WUp   WRht  xxx   |_Acc2_ PgUp  Home  End   PgDn  Bksp
 LCtl   MLft  MDn   MUp   MRht  Btn1  | Btn1  Left  Up    Down  Right RCtl
 LSht*- Btn5  Btn4  Btn3  Butn2 xxx   |_Acc1_ Acc0 _PgUp__Home__End_ _PgDn_
 ---------------------------------------------------------------------------
                 LAlt Del   Ent   ___ | PgUp      _Left_ _UP_  _Down__Right_
                                  -*-<|>
                 <1 ± <2    <3    <4  | 4>         3>     2>   _±_    1>
                    ^
                  (LGUI)
… or this on _MOV for the flat arrow configuration, […], and vi(1) layout:
 <pinky2<pinky<ring <middl<index<indx2| indx2>index>middl>ring> pinky>pink2>
                                     <|>-*-
 BASE   WLft  WDn   WUp   WRht  xxx   |_Acc2_ PgUp  Home  End   PgDn  Bksp
 LCtl   MLft  MDn   MUp   MRht  Btn1  | Left  Down  Up    Right Btn1  RCtl         // vi as in Qwerty
 LSht*- Btn5  Btn4  Btn3  Butn2 xxx   |_Acc1_ Acc0 _PgUp__Home__End_ _PgDn_
 ---------------------------------------------------------------------------
                 LAlt Del   Ent   ___ | PgUp      _Left_ _Down__Up_  _Right_       // vi as in Qwerty
                                  -*-<|>
                 <1 ± <2    <3    <4  | 4>         3>     2>   _±_    1>
                    ^
                  (LGUI)
For the 'arrow' hardware layout (additional key on the right), keys on the first row are sacrificed and lost. The right most key on the second row is also lost. The two keys on places 3 and 4 when counting from the right on the second row, are being moved to the spots for Btn2 and Btn3 on the hand that also has the arrows (those keys are otherwise twice defined for left and right hand).
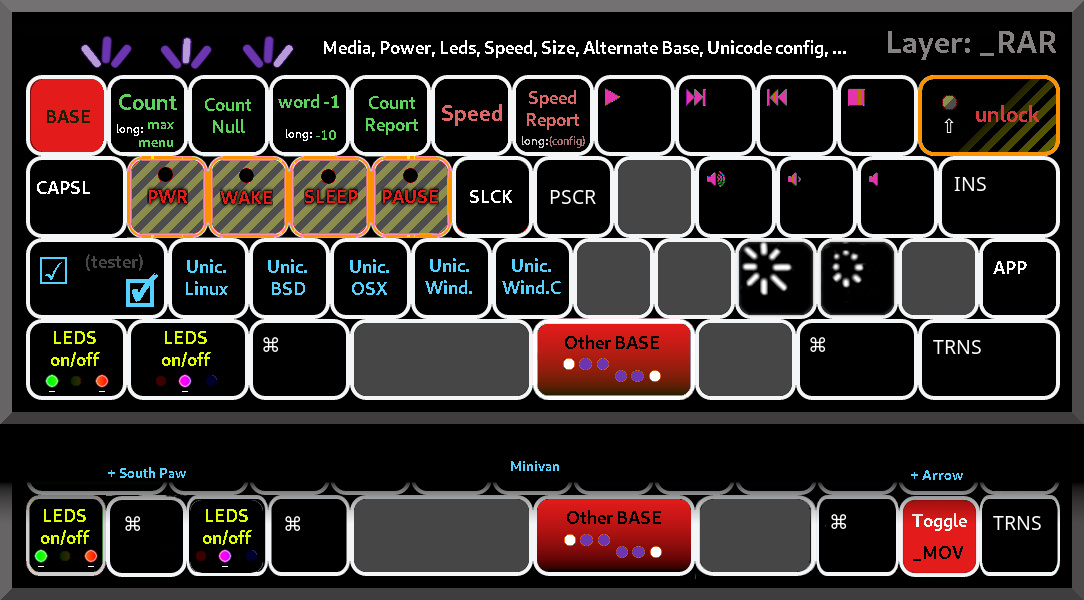
 _RAR (RARe keys. Power keys, Unicode mode, Alternate Base, Media, Brightness, Speed, Size, leds, …)

 <pink2<pinky <ring <middl <indexx<indx2| indx2>index>middl>ring> pinky> pink2>
                                       <|>      -*-                                //(toggle) on _FUN
 BASE  Cnt/Mx Cnull CWmin  CRprt  Speed | SRprt Play  Next  Prev  Stop RSht(•)
 CapsL Power• Wake• Sleep• Pause• ScrLk | PrtSc xxx   Vol+  Vol-  Mute Insert     // • requires Shift
 ☑     uLNX   uBSD  uOSX   uWIN   uWNC  | xxx   xxx   Bri+  Bri-  xxx     APP     // Ü(nicode) tester
 ----------------------------------------------------------------------------
                 SLed  MLeds LGUI  xxx  | !Alter  xxx   RGUI  ___   // Mid-led, Side-leds, !Alternate
                                       <|>                    -*-                   // (Hold) on Base
                 <1  ± <2    <3    <4   | 4>      3>    2>  ± 1>
                     ^                                      ^
                   (LGUI)                                 (_MOV)
Remarks. !Alter switches between normal and alternate Base layer.
☑ is a Unicode tester key. uLNX for Linux Unicode input encoding, uBSD for BSD Unix, uWIN for Windos, uWNC for another Windos encoding. The change is retained between on/off power cycles.
MLed switches on/off the middle led, SLeds switches on/off the side leds.
The keys marked with • require Shift to be activated, as a means of
preventing accidents. Shift here is on (Base) 'Backspace' (upper/right key)
which also reduces accidents (combinations which are never pressed
normally). If you press these keys without 'shift' they print their own
name between angled brackets. Example: pressing the 2nd key on the 3rd
row prints “<POWER>”.
Bri+, Bri-: screen brightness (if your system supports it.)
Speed: toggles speed measuring on/off. SRprt: writes your speed. See topic about Speed measuring.
Cnt/Mx, Cnull CWmin, CRprt: text size measuring. See topic.
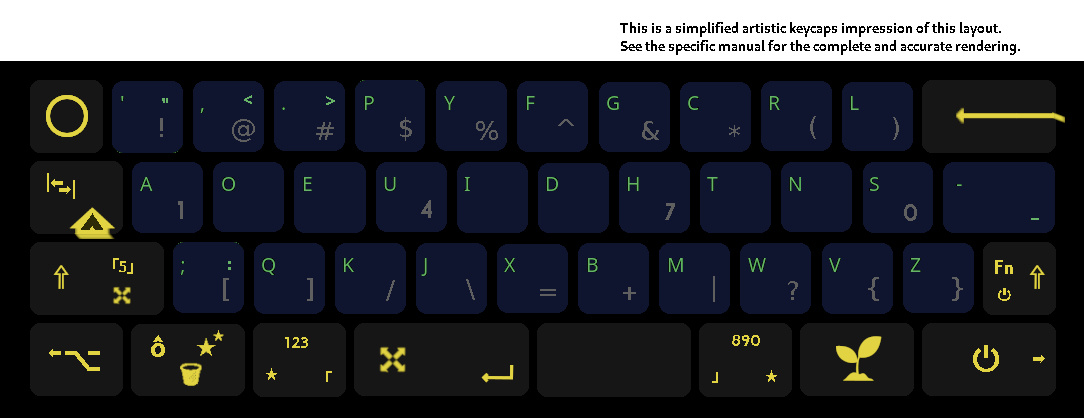
 Layer _PAD Numbers Pad (special symbol versions; regular '1' is not the same as this numpad '1', etc)

 <pink2   <pinky<ring <middl<index<indx2| indx2>index>middl>ring> pinky>pink2>
                -*-                    <|>                                         //(toggle) on _FUN
 BASE     xxx   xxx   .DEL  4LEFT 2DOWN | 8UP   6RGHT *     xxx   xxx   Bspc
 LCtl     1END  2DOWN 3PGDN 4LEFT 5     | 6RGHT 7HOME 8UP   9PGUP 0INS     -
 LSht     xxx   xxx   /     xxx   =     | +     3PGDN 1END  7HOME 9PGUP RSht
 -*-------------------------------------------------------------------------    //-*-  toggle on Base
              LAlt     Del   Tab   ENT  |  NUML  xxx   RGUI  RAlt
                                       <|>
              <1   ±   <2    <3    <4   | 4>     3>    2>  ± 1>
                   ^                                       ^
                 (LGUI)                                  (_MOV)
Remarks: The keys between .DEL and *, + and RSht constitute sort of
navigation clusters, to make it easier to find the number pad versions thereof.
This is the variety for _PAD layer, which resembles a numerical keypad:
 Layer _PAD (Number pad, square layout)

 <pink2   <pinky<ring <middl<index<indx2| indx2>index>middl>ring>pin>pink2>
                                       <|>
 BASE     xxx   xxx   xxx   xxx   xxx   | =     7HOME 8UP   9PGUP -   Bspc
 LCtl     xxx   xxx   xxx   xxx   xxx   | *     4LEFT 5     6RGHT +   RCtl
 LSht     xxx   xxx   xxx   xxx   xxx   | /     1END  2DOWN 3PGDN ,   RSht
 ------------------------------------------------------------------------
               LAlt   Del    Tab   ENT  | NUML  0INS  .DEL  RAlt
                                       <|>
               <1   ±  <2    <3    <4   | 4>    3>  ± 2>    1>
                    ^                               ^
                  (LGUI)                          (RGUI)¹

 ₁) Note anomaly, see Base Numpad for details `./base_numpad.md`.
    Different placement and different meaning, compared to the usual common layers.
 Layer _ACC (ACCented characters, see _RAR layer for input modes)

 <pink2    <pinky<ring <middl<index<indx2| indx2>index>middl>ring> pinky>pink2>
                   -*-              <|>                                            //(toggle) on _FUN
 BASE      áÁ    óÓ    éÉ    úÚ    íÍ    | ýÝ    ijIJ    çÇ    øØ    åÅ    Bksp
 LCTL(Tab) äÄ    öÖ    ëË    üÜ    ïÏ    | ÿŸ    œŒ    æÆ    ñÑ     ß       μ
 LSht      àÀ    òÒ    èÈ    ùÙ    ìÌ    | îÎ    ûÛ    êÊ    ôÔ    â    RSht
 ----------------------------------------------------------------------------
                   LAlt ___   ___   Ent  | Spc   ___   ___   RAlt
                        -*-             <|>                                        //(hold) on Base
                   <1 ± <2    <3    <4   | 4>    3>    2>  ± 1>
                      …                                    …
 Layer _DRA (DRAwings, whatever else (rendering width might vary in different applications))

 <pink2<pinky<ring <middl<index<indx2| indx2>index>middl>ring> pinky>pink2>
                         -*-        <|>                                            //(toggle) on _FUN
 BASE  “„    ”≤    £≥    ∅ ¢   ±ƒ    | ❦♥    🙂🙁  👍👎   ⁽₍    ⁾₎    Bspc
 Tab   ¹₁    ²₂    ³₃    ⁴₄    ⁵₅    | ⁶₆    ⁷₇    ⁸₈     ⁹₉    ⁰₀    RCTL
 LSht 「━    」─   °〇   •§    …·    | ☐☒   ☑🗹     ¿¡    《┄    》┅   RSht     //  ☐ ☒ ☑ 🗹 or ⮘ ⮙ ⮚ ⮛
 -------------------------------------------------------------------------
               LAlt ___   ___   Ent  | Spc   ___   ___   RAlt
                          -*-       <|>      -*-                                     //(hold) on Base
               <1 ± <2    <3    <4   | 4>    3>    2>  ± 1>
                  ^                                    ^
                (LGUI)                               (_MOV)
Remarks. ☐ ☒ ☑ 🗹 or ⮘ ⮙ ⮚ ⮛
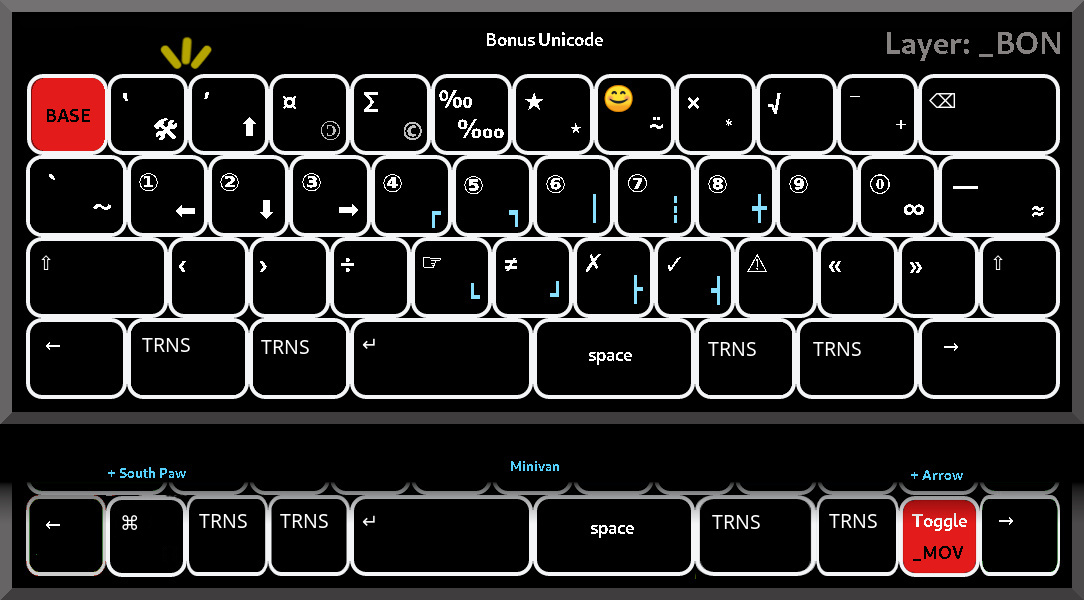
 Layer _BON (Bonus layer, a variety of more stuffs.)

 <pink2<pinky<ring <middl<index<indx2| indx2>index>middl>ring> pinky>pink2>
                               -*-  <|>                                            //(toggle) on _FUN
 BASE  ‛ 🛠  ’ ⬆   ¤ 🄯   ∑ ©   ‰ ‱   | ★ ٭   😊 ⍨  ×  ⃰   √     ⁻ ⁺    Bksp
 `~    ① ⬅   ② ⬇   ③ ➡   ④ ┏   ⑤  ┓  | ⑥ ┃   ⑦ ┇   ⑧ ╋   ⑨     ⓪ ∞    — ≈     // — is a dash (larger)
 LSht  ‹     ›     ÷     ☞ ┗   ≠  ┛  | ✗ ┣   ✓ ┫   ⚠     «     »      RSht
 -------------------------------------------------------------------------
              Left  ___   ___   Ent  | Spc   ___   ___   Right
                    -*-   -*-       <|>      -*-                                // Activation on Base
              <1  ± <2    <3    <4   | 4>    3>    2>  ± 1>
                  ^                                    ^
                (LGUI)                               (_MOV)
4.4 Movement layer options
The movement layer (_MOV) has several configuration options. You
can either have triangle configuration arrows on the left hand
(with navigation keys around it), or a flat arrow configuration on
the right hand (with navigation above it).
You can configure for the arrow hardware layout (one additional hardware key on the right). The additional key on the Base layer can toggle to the movement layer, and than becomes part of the arrow cluster. For both versions (triangle arrows left hand or flat arrows right hand) you can compile this second arrow cluster to be completed with navigation keys (Home, End, PageUp, PageDown).


^ #define ARROWS_TRIANGLE
![]()
^ Illustration of accessing the arrows/navigation with a key on the Base layer
![]()
^ #define ARROWS_TRIANGLE, MORE_KEY__ARROW, MOREKEY2_ARROW_CLUSTER, MORE_key2 _MOV_UP
![]()
^ #define ARROWS_TRIANGLE, MORE_KEY__ARROW, MOREKEY2_ARROW_CLUSTER, MOREKEY2_ADD_NAVIGATION, MORE_key2 _MOV_UP (note change on previously BTN2/3)
![]()
^ #define MORE_KEY__ARROW, MOREKEY2_ARROW_CLUSTER, MORE_key2 _MOV_UP
![]()
^ #define MORE_KEY__ARROW, MOREKEY2_ARROW_CLUSTER, MOREKEY2_ADD_NAVIGATION, MORE_key2 _MOV_UP (note change on previously BTN2/3)

^ #define [MORE_KEY__ARROW, MOREKEY2_ARROW_CLUSTER] VI_SWITCHERYDOO, #undef ARROWS_TRIANGLE
4.5 Numbers pad layer options
This concerns the numbers pad layer, the one that is part of the common layers.

^ #define NUMPAD_COMMON_SQUARE
5 Led colors for layers
  • letters                          Led: low-white/teal/off⁽¹⁾          _DEF_BASE "Default base"
    • letters (alternate)              Led: off/teal/low-white           _ALT_BASE "Alternate base"
  • numbers                          Led: blue/blue/blue                 _DEF_NSY "Default Numbers SYmbols"
    • numbers (alternate)              Led: blue/blue/low-white          _ALT_NSY "Alternate Numbers SYmbols"
  • number pad symbol versions       Led: green/low-white/blue ⁽²⁾       _PAD "numbers PAD"
  • accented characters é, ø, ß …    Led: cyan/cyan/cyan                 _ACC "ACCented"
  • Unicode symbols, ¹, ±, ° …       Led: yellow/yellow/yellow           _DRA "DRAwings"
  • Unicode symbols, ①, ‰, ÷ …       Led: off/yellow/off                 _BON "Bonus"
  • function keys,                   Led: red/red/orange ⁽³⁾             _FUN "FUNction keys"
  • and a movement layer             Led: green/green/green              _MOV "MOVement"
  • keys like Power, Play,           Led: white/purple/purple ⁽⁴⁾        _RAR "RARe keys"

  Leds:
        • ⁽¹⁾ The low-white led is bright-white when capslock is on. Optionally the middle led (cyan) can
              show the color of the last layer that was active.
        • ⁽²⁾ The colors are reversed blue/low-white/green when numlock is on.
              Left led color memory aid: same as either numbers or movement layer for numlock on/off.
        • ⁽³⁾ The colors are reversed to orange/red/red when set to deactivate after one F-key press.
        • ⁽⁴⁾ The colors are reversed purple/purple/white, indicating which of the two base layers
              is active (see below).
        • Middle led: Breathing effect. When not breathing, keyboard is not working normally with the computer.
                    - When speed measurement is active, the middle led color indicates the speed, unless
                      text size counting set to a maximum is active.
                    - When text size counting is active and set to a maximum amount, the middle led color
                      indicates progress to the limit from green to red, flipping white/red on the limit.
                    - When on Base layer it shows a teal color, or (compile option) the layer most recently active.
                    - When the left/right leds are off, when on Base, it shows a teal color (not last active), even
                      if so compiled.
        • Leds can be switched on/off on the _RAR layer (SLeds, MLed).
6 Compile options
Layout
• Several layouts to choose from: Qwerty, Dvorak, Colemak, Workman, Numpad.
• You can use the keyboard with two different letters/number-symbols layouts.
Hardware
• Hardware key configurations: default (44), arrow (45), south paw (45), arrow + south paw (46).
![]() (On the
(On the _RAR layer, the additional south paw key is more to the right.)
• What the additional hardware keys for arrow, south paw should be.
Navigation cluster
• An arrow cluster for arrow hardware configuration, on the _MOV layer.
• All navigation keys around arrow hardware configuration arrow cluster on _MOV layer.
• Navigation cluster in a triangle (WASD) (left hand), or flat layout with optional vi(1) layout.
Numpad (in common layers)
• Numpad with numbers in a row.
• Numpad with layers in a block form.
Special functions
• Set speed measuring on/off at keyboard startup.
• Set text size measuring on/off at keyboard startup.
Changing symbols
• Switching the GUIs left/right, and some other specific key changes.
• Reduce firmware size/bloat: remove or eviscerate Unicode layer(s).
For the complete list, see
7 Language support
7.1 Input methods
There seem to generally be two ways in QMK for typing a language other than English. One is to use a language specific remapping on the computer operating side, and to use the QMK supplied symbols in the keymaps. This may include the use of a “dead key”. Presumably you can also still use the Unicode symbols.
⚠ There are currently no such Base pair layouts available. If this is the method you want, you may want to look elsewhere.
The other way is to type the additional symbols in Unicode. The computer operating must understand these special sequences. Several Unicode input modes are available, which can be changed while the keyboard is running. There is no need for a “dead key”. The language setting in the computer operating system can be set to English. This layout is designed for this method, to avoid the dead key problem.
7.2 Unicode symbols
For the remainder of this chapter the Unicode input method is assumed.
You may be able to type your language, with the help of some of the Unicode layers and one of these layouts: Qwerty, Dvorak, Coleman, Workman. The following languages might work for you this way.
 • Dutch (éëèïijí)
 • English (—“”‛’)
 • French (çœæéèàòùîûêôâëïüÿ)
 • German (äöüß)
 • Norwegian, Danish (œæøå, éêèëóêò, üáà …)
 • Spanish (¿¡ñ)
 • Swedish (äåö …)
The following quotation marks are available, which seems it would cover these languages:
 'test' "test" “test” „test” ‛test’ ,test’¹ «test» ‹test› 《test》 「test」 — test

 ¹) Left side is a basic comma.
See the _ACC accented characters layer for all characters with diacritic markings.
If you miss a symbol, you could replace one you don't use and add it yourself (by
reprogramming the source code).
8 Speed measuring
  ‛Speed’ starts speed measuring.
  ‛SRprt’ stands for ‛Speed Report’:
            • Tap to get your speed report.
            • Hold for a while for led color compilation (see below).
  ☞ Text size counting (see below) middle led colors take precedence,
    when a maximum is set, over layer colors or speed measurement.
With the key ‛Speed’ on the _RAR layer, the speed of your latest
completed batch of 25 key presses is computed, as well as the average of
all your batches of 25 keys. The speed is displayed as the color of the
middle led, which otherwise shows the layer color. A bright white middle
led indicates ‛Speed’ has just been activated.
With the key ‛SRprt’ (short for ‛Speed Report’), the keyboard will write your typing speed either in keystrokes per second (k/s) or words-per-minute (wpm), depending on your compilation configuration.
“Keystrokes per second” uses the following format: <A k/s B.B k/s Cx25keys>. A is the amount of key presses per second (k/s) of your
last batch, B.B is your average over the last C batches of keys.
When using “Words per minute”, A is in word-per-minute, B is also
in words-per-minute: <A wpm B wpm Cx25keys>, no decimal precision.
Example: <150wpm;108wpm20x25keys>
Batches with 0 k/s are not counted to the average. You can take a longer break without it affecting your average.
8.1 Speed Led color compilation assist
If you hold the ‛Speed Report’ key for one second, it will increment the speed, and led color accordingly. This can be helpful when configuring your speed measuring compile settings. This works best with speed measuring set off.
9 Text size measuring
  ‛Cnt/Mx’ stands for ‛Count/Maximum’:
            • Tap to start counting, tap again to suspend.
            • Hold > 0.5 seconds for maximum menu.
  ‛Cnull’ stands for ‛Count null’:
            • Tap to set the counts to zero.
  ‛CWmin’ stands for ‛Count Word minus’:
            • Tap to detract one word from the word count.
            • Hold > 0.5 seconds to detract 10 words.
  ‛CRprt’ stands for ‛Count Report’:
            • Tap to get a counting report.
  ☞ ‛Count’ and ‛Speed’ (see above) reports get added to the
    character count, but not to the word count.
  ☞ Auto-repeating keys do not get counted as characters.
You can count your text by character and word, by activating the key
‛Count’ on the _RAR layer. Pressing ‛Count’ again will suspend
counting, pressing it yet again resumes where the count left off earlier.
The middle led turns cyan when no maximum is set (see below),
or to green when it is set.
You can set a maximum to type, with the ‛Cnt/Mx’ key. In your
editor (or wherever typing these characters is harmless) you will get
the following menu by pressing the ‛Cnt/MX’ key for at least half
a second: <Nc|w>. In here: N stands for your numerical input, c
for a maximum count in characters or w for a maximum in words.
Start typing a number, finish with either c or w to make the maximum be counted in either characters or words. If you want to leave the menu before giving c or w, enter a dot ‛.’ or ‛Escape’, which will leave the maximum value at 0 (zero). A maximum value of zero implies there is no maximum.
Setting a maximum of 1000 characters looks like so:
    Hold ‛Cnt/MX’ results in: `<Nc|w>`
    Then type “1000” results in: `<Nc|w>1000`
    Then type “c” results in: `<Nc|w>1000->1000c`
    At this point the keyboard is out of this special input menu.

    The keyboard indicates what it accepted as your input, by
    repeating the number, just before your last input is being printed.
With a maximum established, the middle led color goes from green to red, as you type. When the maximum is reached, the keyboard will output a Backspace character for every key you subsequently press, making it impossible to go any further, until text size counting has been disabled, or the count is reduced. The middle led changes color between red and white while at the maximum set size, for every new input character.
To get your word count report, press ‛CReport’ short for: ‛Count
Report’. It comes in the form: <Ac;Bw>, where A is your character
count, and B is your word count. Example: <5420c;547w>.
When a maximum is established, the report will only be given in
either characters or words, and the maximum is given with it, like so:
<66w>[200w]. 66 words have been written, a maximum of 200 words has
been set.
If you have a maximum established and use it across different articles, you no longer have the total count. You can activate speed measuring, which in its report includes the total characters pressed.
9.1 Text size Usage
It is assumed that you will take the report in the document you are editing, and then delete it. If you do character counting, the value of the report itself is added to the character count. Therefore you should delete that without using an auto-repeating on the deletion key. That way the characters are subtracted again.
If you count in words, the report is not added to the word count. You can delete it however you want.
This works the same for a ‛Speed Report’ you might like to take. You can take it in the document, and then delete it in the same, without affecting the text size counting in characters or words. When deleting keys with Backspace or Delete, the character count goes down accordingly, the word count does not.
Words are counted by counting Space and Enter key presses. Immediately repeating blanks do not add to the word count. You can only manually subtract from the word count, using the key ‛CWmin’ short for ‛Count Word minus’. This means that if you delete sections in your document, you need to manually subtract the same words.
Example: after typing something and then typing <Enter> twice to start a
new paragraph, counts for one word. When deleting three words with their
three blank areas, then tapping ‛Count Word minus’ three times,
should result in an accurate word count. To add words to the count,
type mock ones and then delete them: “x x x x” adds three words,
“y y y ” also adds three words (three separate blank spaces).
Layer changes, shift and unusual/complex keys do not get counted. Navigation, arrow and mouse keys do not get counted. Auto-repeating of keys does not affect the character count, therefore should be avoided if you want to count in characters.
10 Making your own base layer(s)
You can insert your own _DEF_BASE, _DEF_NSY and/or _ALT_BASE, _ALT_NSY
Base plus number/symbols layer pairs, integrate it nicely with the rest
of the code, and re-define a special characters layer to go with it if
you want (etc). The idea is to make it easy to change the alphanumerical
keys, while leaving the modifiers, layer switch keys etc. the same.
YOUR_KEYMAP stands for a name you choose.
First we will look at a simple keymap, without its own configuration options or header file.
 ① Make a file named: `./base_YOUR_KEYMAP.c`), with at least
   those two layers: _..._BASE and _..._NSY. It is probably best to
   copy one of the existing `./base_....c` files, and edit that.

 ② Add a #define to `./user_config.h`:
   #define BASE_YOUR_KEYMAP__DEF_BASE
   #define BASE_YOUR_KEYMAP__ALT_BASE
   Under the topic ‛Base layers’ there is a comment to help you.

 ③ Edit ./keymap.c to have your new file #included, using your just defined
   preprocessor element. Close to the other #includes is a comment there to
   help you. Look just under the line with this, in ./keymap.c:

   const uint16_t PROGMEM keymaps[][MATRIX_ROWS][MATRIX_COLS] = {
   (…)
   // // ⬇ insert your ./base_YOUR_KEYMAP.c #include here:

   // # if defined(BASE_YOUR_KEYMAP__DEF_BASE) || defined(BASE_YOUR_KEYMAP__ALT_BASE)
   // #     include "./base_YOUR_KEYMAP.c" // Your Keymap.
   // # endif
Now you have integrated your base layers alternative. To compile it:
 ④ _Activate_ your #define BASES_YOUR_KEYMAP__DEF_BASE or
   BASES_YOUR_KEYMAP__ALT_BASE in `./user_config.h`,
   _Remove_ any other base layers from being defined on the
   same spot _DEF_BASE or _ALT_BASE to prevent a conflict.

 ⑤ Check Preprocessing with:
   > gcc -E keymap.c | less

 ⑥ Compile and flash to your keyboard.
You can redefine any layer in your new ./base_YOUR_KEYMAP.c
You can do that by setting one or more of the BASESFILE_LAYER_... defines in
your own ./base_YOUR_KEYMAP.c file. See near the top of an existing
./base_....c file for clues.
_ACC in particular is a layer meant to augment a keymap with special
characters for a given language/layout in the base layer(s). Perhaps you
want to redefine it, for example.
Example: Having done the above points ① ➡ ④ for a ./base_YOUR_KEYMAP.c file.
Let's say you re-arranged keys on _ACC to suit ... French.
 ⑦ In your `./base_YOUR_KEYMAP.c`:
   #define `BASESFILE_LAYER_ACC`
   The `_ACC` in ./keymap.c will now be ignored.
You can re-define _ACC in your own file.
 ⑧ Copy an existing `_ACC` layer into `./base_YOUR_KEYMAP.c`
   Edit it so that French characters like ‛Ç’ ‛«»’, ‛œ’, ‛æ’,
   ‛ô’, ‛é’ etc. are in positions that work best. You can look in
   `unicode_weurope.h` to find some Unicode points already defined.

 ⑨ Compile and flash to your keyboard.
Now we will look at a more complicated keymap, where you are also altering
preprocessor constants defined in 
Example: the ./base_numpad.c has an option to entirely eviscerate the
_PAD layer, for convenience. (Why is this even useful ? Good question !
One reason could be that it can set up a default, so that anyone who chooses
this ./base_numpad.c Base layer, automatically is eviscerating the _PAD
common layer, without having to do anything else. On the downside, it
could be confusing that one option is configured in two places.)
Having done the above points ⑦ ➡ ⑧ as well, let's say for some reason you need to reverse Left GUI and Right GUI.
  ⑨ Copy your User Configuration Block at the top of your `./base_YOUR_KEYMAP.c`
    and the GPL License, and place that in a new _header_ file:
    `./base_YOUR_KEYMAP.h`

  ① ⓪  Write the necessary code to set and unset the constant
       `SWITCH_GUIS` in your `./base_YOUR_KEYMAP.h` file You are encouraged
       to write code which overrides any setting in `./user_config.h,` for
       those constants which you choose to affect, for simplicity sake.
       (This is not a C programming manual, so it won't get into this.)

  ① ①  Look in `./user_config.h`, and #include your header file there, in
       a similar way as was done for your C code file. It should be just
       below the user configuration block, and has a template for you.

  ① ②  Compile, flash and test.

  ① ③  It would be nice to put a remark on the general preprocessor constants
       which you might be affecting, that your keymap could be affecting them.
       You would edit the ./user_config.h comments with a short one line notice,
       such as:

       *
       * ⚠ Note: ./base_YOUR_KEYMAP.h can overrides this setting, if compiled with that ‛Base’ layer.
       */
Putting your *.h header file in
Perhaps a separate header file is overkill. On the other hand, whatever
preprocessor logic is necessary after user configuration has been given,
can be handled in one place, if #included as suggested. It allows you
to override the settings in ./base_YOUR_KEYMAP.h settings, have everything that could be relevant
close at hand, then forgetting about those settings once compiling
with another Base layer, and be able to return to it with previous
configuration already done.
You can also just #include your header file at the top of your
./base_YOUR_KEYMAP.h file, if it does not touch anything else but your
local keymap.
11 Evisceration
Cutting down the keymap reduces the firmware size, and helps reducing mental clutter from having masses of symbols you might never want to use.
You can compile as a single layout. Define only a ‛Default’ base pair,
and set MINIFAN_SINGLE_LAYOUT (
You can remove the layers _ACC, _DRA and/or _BON (see
REMOVE_ACC).
You can remove a set of symbols from one or more of Unicode layers,
such as not having box drawing characters on _BON, or no sub-script
numbers on _DRA.
12 Key associations
The keymap was designed to have the same or similar keys on the same key
or close to it, on different layers. Sometimes the association goes by
what finger is used, and/or on what row. For example the symbol ‛(’
on the numbers-symbols layer (_NSY), becomes the symbol ‛⁽’ on
another layer.

12.1 Compared to regular keyboard
The main advantage compared to a regular keyboard is to never have to leave the homerow.
Basic trade-off examples are: (①) on a regular keyboard you need to reach two rows up to press a number like ‛4’; (②) three rows up to reach an F-key like ‛F4’; (③) or move your hand entirely to reach the navigation cluster for ‛Up-Arrow’. On this Minivan 40% keyboard with this ‛Minifan’ layout you (①) move either thumb sideways a little to hold down the number/symbols layer key, and then press down left index finger for ‛4’; (②) press and let go ‛Right-Shift’ to toggle the F-keys layer and then press down left index finger for ‛F4’; (③) press down left thumb on where it probably is resting, and then move left ring finger one row up to reach ‛Up-Arrow’.
A downside is that you would be typing a non-standard keyboard, making it harder to adapt to regular keyboards. On the upside, this keyboard is small enough to take it with you. Plugging it into some other computer is only going to work, if that other computer is not using a language setting which changes too many keycodes, or if changing the language setting is not a problem.
In total the differences are probably marginal. It can be worth it if you are doing a lot of 10 finger typing. The change in efficiency might be similar to changing from Qwerty to Dvorak or another such optimized layout, although incomparably much easier to learn than changing from Qwerty to Dvorak (in author's personal experience). If the latter can take years, the former could take weeks to months. Keep in mind that you have the whole standard letters keymap where it used to be, plus the numbers with their shifted symbols are in predictable locations.
The hardest to learn out of the standard symbols, will be: /=+|?, and to a lesser degree {}[]. These are now evenly spread out, rather than this mess you have under right little finger on regular keyboards.
13 Trouble shooting
• Compiling
If the firmware is too large, you can try using a different version of the compiler, or you may have to reduce size by removing certain options.
• Unicode
Unicode is chaos: try going to _RAR layer, and hit the Unicode
operating system buttons.
• Leds
Leds not working after flashing firmware: try going to _RAR layer,
and hit the key MLeds and SLeds, which switch Leds on/off.
• Weird layer jumping
You weirdly end up on the _PAD, _FUN or some other layer while
typing ? If you jump to layers which are on Shift key toggles, this
is a typing mistake.
• Difficult/impossible key combinations ?
An example of a difficult key combination is: the modifier Control,
Shift, or Alt, with media key “volume up” (or down, etc). It may
work to press and hold “Control” (which should communicate “Control
depressed”), then activate _RAR layer with the hold key (which
communicates nothing to the computer attached to the keyboard),
press and let go “volume up” (which should communicate just that), let
go of the _RAR layer (which again communicates nothing), let go of
the Control key (which should communicate “Control released”)..
14 Why you want this layout
☞ This layout seems easy to learn and predictable. It is not personalized or idiosyncratic, but rather based on existing keyboards, typewriters and commonly used symbols in the supported languages. The key placement is as close to a regular keyboard as possible, unless there are clearly better placement choices.
☞ The normally most used layer after letters is “numbers & symbols”
(123…, !@#…, []/…, called _NSY). This layer you can access by either
your left or right thumb, to spread fatigue.
☞ Right hand pinky is no longer overused, as it is on regular keyboards.
☞ 0-9 enumerations / numbers, they are on the same fingers as a standard keyboard.
☞ The symbols normally reached by shifting a number, are also still on the same fingers.
☞ Because one often uses an F-key only once, the layer can switch back to Base after an F-key is used.
☞ Modifier combination keys on _FUN layer for use with F-keys.
☞ The movement layer has a bunch of layout options, and allows for mouse use.
☞ The layer with Power buttons protects you from accidental keystrokes on the critical keys.
☞ If you need working with Control/Shift/Alt and a pointing device in right hand, you can quickly get uncluttered such keys by tapping left shift.
☞ The accented layer makes it possible to set the keyboard in a mode on the computer side without dead-keys.
☞ The second Unicode layer adds a fair amount of fun stuff to spice up your writing. Write H₂O, 2⁷·⁰=128, ±8 °C, §2.1, 2 ³/₈", a note⁴, £ 6.²⁵ etc.
☞ The third Unicode layer adds a proper dash — and French style quotations «»‹› and other stuff. ① «Ça va bien», ② 5 × 3 ≠ 14, ③ .083% ÷ 2 ≈ 4‱ ➡ 4.₁₅‱
              ┏━━━━━━┓
              ┃ test ┃
            ┅━╋━━━━━━┛
              ┇ ④
☞ Speed and text size measuring, including to set a maximum on your text input. These are features not part of regular keyboards.
☞ Easy to create your own dual layout for letters / numbers.
☞ If you do want to reprogram the code, it has a lot of comments to make it easier to follow, and over the top much documentation as you can see.
15 BUGS
No real bugs known currently. Just some minor issues …
LCTL_T ( KC_TAB ) is not seen as a blank by word counting, use as Control is not
ignored in character counting. (This minor issue is ignored for now. Tab is not
normally used in text writing.)
The evisceration may not have been worked out yet into the ultimate scrubbing of everything that may have become redundant, because it does complicate the code with a lot of #defines. Perhaps it should be done eventually, if there is an actual need.
➡ You can send bug reports to what seem useful channels, and/or contact e-mail. Thanks
16 Resources
This links to an external file, with some additional resources. Resources
 ☞ Gimp .xcf files.
 ☞ Some precompiled hex files.
 ☞ Documentation in other formats.
   …
17 Author(s)
This keymap.c was edited from the Minivan default, original LED support was copied/edited from ../jetpacktuxedo/ keymap. Thanks to QMK support for their help, especially Drashna.
Personal note: This keymap came about because of a sudden need for a replacement keyboard. It took over a year to make (≈ 1.5 h/day). The goal became to make a good keymap for everyone without the time to make one.
Written on the Minivan: Jos Boersema. contact If anyone forks this or whatever, feel free to drop me a note.
Contributions to this key map: - …